


I’m so happy to share this homemade joint support cat treat recipe because it uses simple, familiar ingredients many cat parents already trust. These baked treats focus on fish and fish oil, which are rich in omega-3 fats that can support joints, skin, and coat. I like that I can control what goes in, with no extra fillers or strange additives. The treats bake quickly and come out firm and crunchy, which many cats enjoy. They are meant as an occasional snack, not a replacement for a full and balanced cat diet.
I started making these treats when I wanted a simple homemade option that felt a little special but still safe for my cat. The smell of tuna alone usually gets instant attention in my kitchen. Once baked, the treats are small, firm, and easy to break into tiny pieces for cats.
What makes this recipe stand out is the focus on fish based ingredients. Tuna and salmon or fish oil are common flavors many cats already love. The dough is easy to work with and does not need any fancy tools.
Some helpful reasons to try this recipe:
- Uses simple, easy to recognize ingredients
- No added sugar, salt, onion, or garlic
- Baked until firm for a crunchy texture
- Easy to store in the fridge or freezer
These treats are only a small extra and should never replace complete cat food. Please talk to your vet about what is safe and appropriate for your cat, especially if your cat has health issues or allergies.
How to Make Joint Support Cat Treats
- Preheat the oven and prepare a baking sheet
- Mix the tuna, egg, and oil together
- Stir in the flour and optional parsley
- Add a little water if needed to form a dough
- Roll out the dough and cut into small pieces
- Bake until firm and lightly golden
- Let the treats cool fully before serving
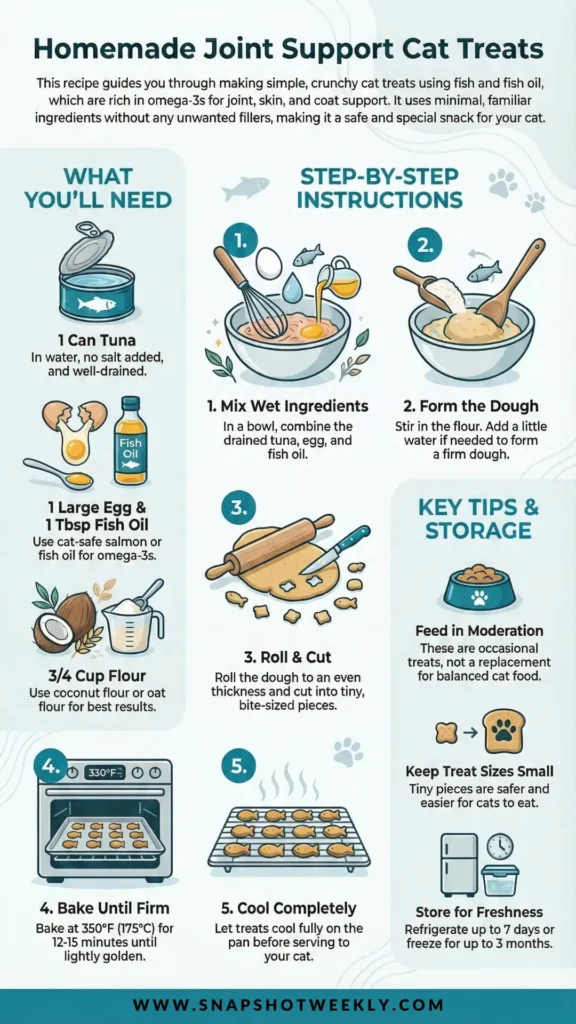
Ingredients
- 1 can tuna in water (drained, no added salt)
- 1 large egg
- 3/4 cup coconut flour or oat flour
- 1 tablespoon salmon oil or fish oil (cat safe)
- 1 teaspoon dried parsley (optional)
- Water as needed (to help form the dough)
Directions
- Preheat your oven to 350°F (175°C) and line a baking sheet with parchment paper. This helps prevent sticking and makes cleanup easier.
- Place the drained tuna in a bowl and break it up with a fork. Add the egg and fish oil, then mix until well combined.
- Stir in the flour and the optional dried parsley. Mix slowly so the flour blends evenly into the wet mixture.
- Check the dough with your hands. It should feel firm but not crumbly, so add small amounts of water if it feels too dry.
- Roll the dough out to an even thickness and cut it into very small, bite sized pieces that are safe for cats.
- Place the pieces on the prepared baking sheet and bake for 12 to 15 minutes, until the treats look firm and lightly golden.
- Remove the tray from the oven and let the treats cool completely on the pan. Cooling helps them firm up more.
- Make sure the treats are fully cool before offering any to your cat to avoid mouth burns.
Process Details
- The dough should hold together when pressed and not stick heavily to your fingers.
- Thinner treats bake faster and become crunchier than thicker ones.
- A rolling pin and small knife work well for shaping tiny pieces.
- Keep pieces small since cats prefer small bites and chew differently than dogs.
- Treats are done when they feel firm and dry to the touch.
Tips for Success
- Always read labels to avoid onion, garlic, excess salt, or sweeteners.
- Use only the flour options listed, since these were part of the original recipe.
- Keep treat sizes very small to reduce choking risk.
- Remember these are treats, not a meal, and should be fed in moderation.
- Bake a little longer for extra crunch, but do not burn them.
- Talk to your vet before making big changes or if your cat has joint problems.
Serving Ideas
- Offer one or two small pieces as a special reward
- Break into tiny bits for training or bonding moments
- Serve after grooming or nail trimming
- Use as an occasional treat on calm days
- Adjust portions based on your cat’s size and daily food intake
Storage & Freezing
- Store the treats in an airtight container in the refrigerator for up to 7 days.
- Keep them dry and sealed to maintain their crunch.
- Freeze extra treats for up to 3 months in a freezer safe container.
- Thaw frozen treats in the fridge before serving.
- Discard any treats that smell off, look moldy, or feel sticky.

These joint support cat treats are a simple way to make something homemade with ingredients many cats already enjoy. I love knowing exactly what goes into each bite and sharing a small moment of care with my cat.
- Cut treats into different small shapes if you like
- Roll thinner or thicker for slight texture changes
- Watch your cat closely the first time they try them
Making treats at home can be a small but meaningful way to show love, and those quiet moments with your cat are always worth it.


