


I’m so happy to share this simple crunchy cat biscuit recipe because it is easy to make and uses basic, cat safe ingredients. These biscuits are made with tuna, egg, and oat flour, which give a strong savory smell many cats enjoy. I like that they are baked at home with no added sugar or seasonings. The firm texture offers a light crunch, which can help scrape the teeth a little while chewing. These are meant as an occasional treat, not a replacement for proper dental care.
I wanted to try a homemade crunchy treat that felt fun and simple for my cat. While brushing and vet approved dental products matter most, I still enjoy making small treats at home now and then.
These biscuits bake up firm and crisp when cooled. The tuna scent gets attention right away, and the small size makes them easy to portion. They are best thought of as a snack with a crunch, not a dental solution.
Why I like this recipe:
- Very simple ingredient list
- No added sugar, salt, or spices
- Crunchy texture cats can nibble
- Easy to bake and store
Homemade treats should only be a small part of a cat’s diet. Please talk to your vet about what is safe and appropriate for your cat, especially for dental or health concerns.
How to Make Dental Health Cat Biscuits
- Preheat the oven and prepare a baking sheet
- Blend the tuna and egg until smooth
- Mix in the oat flour and optional parsley
- Shape into small pieces
- Flatten slightly for even baking
- Bake until crisp
- Cool completely before serving
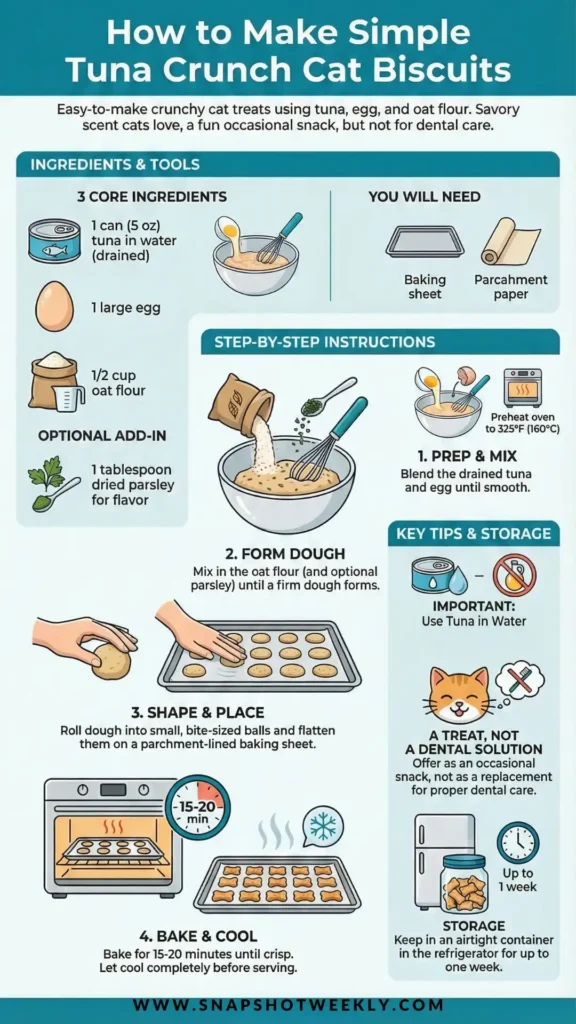
Ingredients
- 1 can (5 oz) tuna packed in water, drained (plain, no added salt)
- 1 large egg
- 1/2 cup oat flour
Optional add ins (choose 1):
- 1 tablespoon dried parsley (optional)
Directions
- Preheat your oven to 325°F (160°C) and line a baking sheet with parchment paper. Set it aside.
- Place the drained tuna and egg into a bowl or blender. Mix until it forms a thick, even mixture.
- Add the oat flour and dried parsley if using. Stir until a workable dough forms.
- The dough should feel firm but not crumbly. If it falls apart, mix a little more until it holds together.
- Roll small amounts of dough into bite sized balls and place them on the baking sheet.
- Gently flatten each ball so it bakes evenly. Bake for about 15 to 20 minutes until crisp.
- Remove from the oven and let the biscuits cool fully on the tray.
- Only serve once completely cool so your cat does not hurt their mouth.
Process Details
- The dough should be stiff enough to shape without sticking.
- Smaller biscuits bake more evenly and are safer for cats to chew.
- Flattening helps the center bake through and turn crisp.
- Biscuits are ready when they feel hard and dry on the outside.
- A parchment lined tray helps prevent sticking and burning.
Tips for Success
- Always choose tuna packed in water, not oil or brine.
- Skip parsley if your cat is sensitive or picky.
- These treats do not replace VOHC approved dental products.
- Offer only small amounts, not daily.
- Do not feed raw dough.
- Ask your vet before using homemade treats for dental concerns.
Serving Ideas
- Offer one small biscuit as an occasional treat
- Break into smaller pieces for smaller cats
- Serve after playtime as a reward
- Use as a special snack, not a meal
- Adjust portions based on your cat’s size
Storage & Freezing
- Store biscuits in an airtight container in the refrigerator.
- They stay fresh for up to one week.
- Crunchy texture helps them hold shape during storage.
- Freezing is possible in a sealed container.
- Discard any biscuits that smell odd or look moldy.

Dental Health Cat Biscuits are a simple way to offer a crunchy homemade treat with familiar ingredients. I enjoy making them knowing exactly what goes into each bite. They are best used as a fun snack alongside proper dental care.
- Change size for softer or crunchier results
- Shape into tiny discs for easy chewing
- Watch your cat the first time they try them
Small homemade treats can be a nice way to share care and attention with your cat.


