


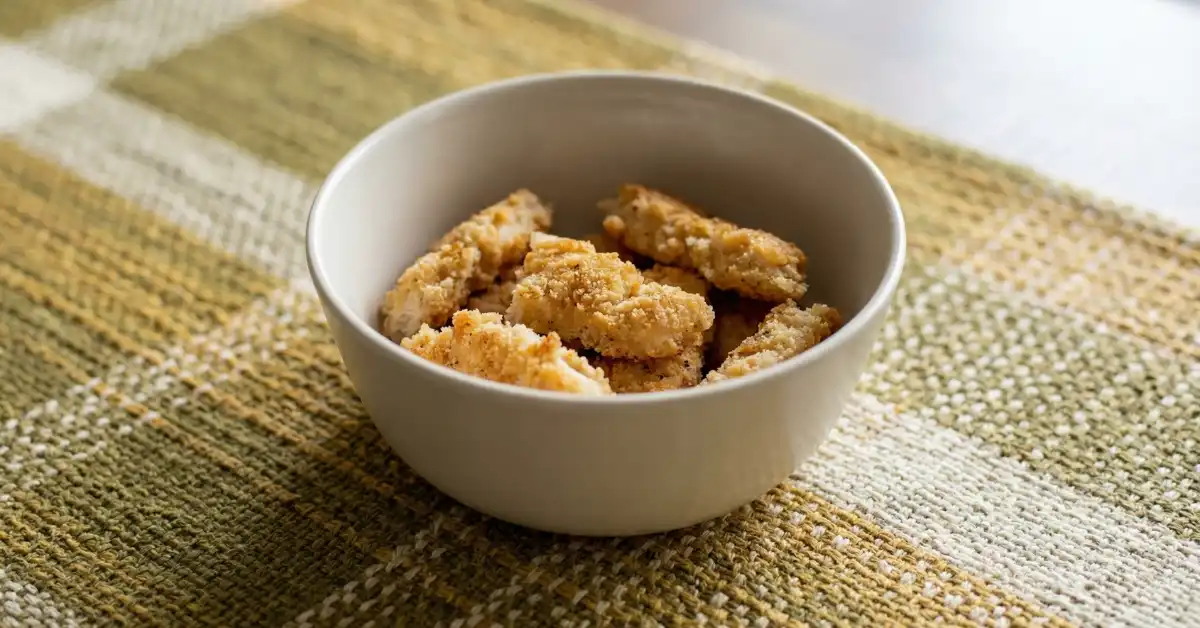
I’m so happy to share this crispy chicken strip recipe because it turns plain chicken into a crunchy, cat safe treat with no spices or oils. These strips are made from simple, unseasoned chicken breast and dried slowly so they become crisp and easy to break. I love that this recipe avoids salt, garlic, onion, and added fats that are not good for cats. It feels good to make something at home where I know exactly what is inside. This is a simple method that creates a natural jerky style treat many cats enjoy.
When I first made these crispy chicken strips, I wanted a treat that smelled good to my cat but stayed very simple and safe. I noticed how excited my cat got just from the smell of plain chicken drying in the oven. That told me I did not need any seasoning at all.
What makes this recipe special is the texture. The chicken is sliced very thin and dried slowly, which turns it crunchy without frying or breading. This helps avoid ingredients that can upset a cat’s stomach or cause health problems.
I also like that this recipe gives me control. I can choose the thickness, break the strips into tiny pieces, and offer them only as treats, not meals.
Why I like this recipe
- Only one main ingredient
- No salt, spices, or added oils
- Crunchy texture many cats enjoy
- Easy to store and serve in small pieces
Every cat is different, especially with food sensitivities. Please talk to your vet about what is safe and appropriate for your cat.
How to Make Crispy Chicken Strips for Cats
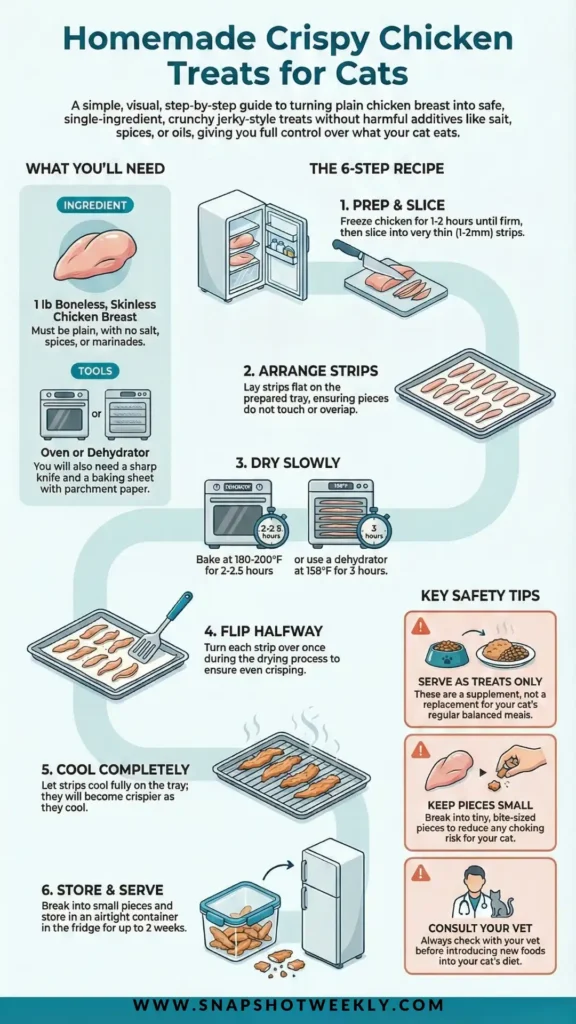
- Firm the chicken in the freezer so it is easier to slice.
- Cut the chicken into very thin strips.
- Lay the strips flat without overlapping.
- Dry the chicken slowly using an oven or dehydrator.
- Flip the strips partway through drying.
- Let everything cool fully before breaking into small pieces.
- Store properly and serve only in moderation.
Ingredients
- 1 lb boneless, skinless chicken breast (plain, unseasoned, no salt or spices)
Optional add ins (choose 1):
- A very light dusting of catnip after cooling (only if your vet says it is safe)
Directions
- If you are using an oven, preheat it to its lowest setting, ideally between 180°F and 200°F. If using a dehydrator, set it to 158°F. Line a baking sheet with parchment paper or prepare dehydrator trays.
- Place the chicken breast in the freezer for about 1 to 2 hours. It should feel firm but not frozen solid, which makes slicing easier.
- Use a sharp knife to slice the chicken into very thin strips, about 1 to 2 mm thick. Thinner strips dry better and become crisp.
- Lay the chicken strips flat on the prepared tray. Make sure the pieces do not touch or overlap so air can move around them.
- If using the oven, bake for about 2 to 2.5 hours, flipping the strips halfway through. If using a dehydrator, dry for about 3 hours.
- The chicken is done when it is completely dry, slightly translucent, and feels crisp rather than soft.
- Let the strips cool fully on the tray before touching or storing them. Cooling helps them firm up even more.
- Break the strips into small, bite sized pieces before serving so your cat can eat them safely.
Process Details
- The chicken should feel very firm and dry when finished, not bendy or moist.
- Thinner strips dry faster and get crispier than thicker ones.
- A sharp knife makes slicing safer and more even.
- Smaller pieces are better for cats and reduce choking risk.
- If any strip feels soft inside, return it to the oven or dehydrator to dry longer.
Tips for Success
- Always check that the chicken is plain, with no seasoning, marinades, onion, or garlic.
- Skip any batter, breading, or oil, since these are not safe for cats.
- Keep pieces very small, especially for kittens or older cats.
- Offer these only as treats, not as a replacement for regular cat food.
- If your cat has health issues or food allergies, talk to your vet before offering new treats.
- Stick closely to the drying method to prevent moisture from staying inside the strips.
Serving Ideas
- Break into tiny pieces and give as occasional rewards.
- Use as a special treat after playtime.
- Offer one or two pieces during training or bonding time.
- Crumble a very small amount over food for added interest.
- Adjust portions based on your cat’s size and daily diet.
Storage & Freezing
- Store cooled strips in an airtight container in the refrigerator for up to 2 weeks.
- For longer storage, freeze the strips in a sealed container.
- Thaw frozen strips in the fridge before serving.
- Crunchy treats last longer when kept very dry and sealed well.
- Throw away any pieces that smell off, look moldy, or feel sticky or soft.

These crispy chicken strips are worth making because they are simple, natural, and made with care at home. I love knowing exactly what my cat is eating and seeing that happy reaction when I offer a crunchy treat.
- Break pieces smaller or larger to match your cat’s needs.
- Adjust slice thickness to change how crunchy they become.
- Watch your cat closely the first time they try this treat.
Making homemade treats like this is a small way to show love and build trust with your cat every day.


