


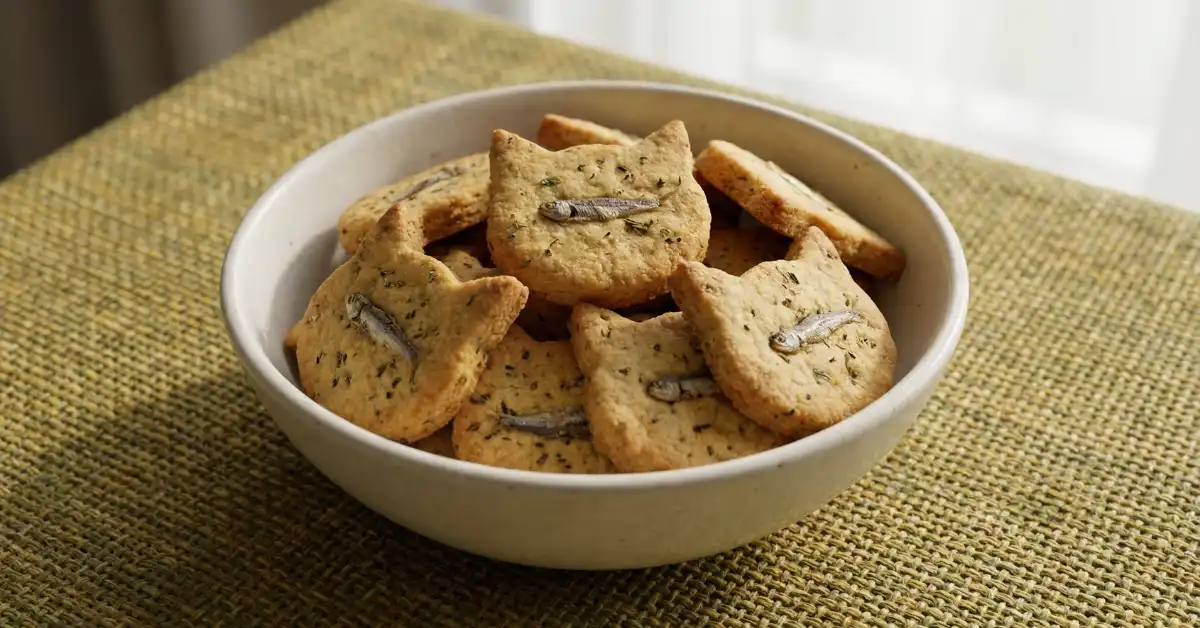
I’m so happy to share this simple Anchovy Cat Cookies recipe because it uses just a few basic ingredients and turns them into a fun, fishy treat. These little cookies are packed with anchovy flavor that many cats love, and they are made without added sugar or strange fillers. I like that I can see every ingredient going into the bowl, which helps me feel more confident about what I am giving my cat. They bake quickly and are easy to shape into tiny, cat sized bites. Because anchovies are salty, these cookies are best as an occasional treat and not an everyday snack.
The first time I made these anchovy cookies, my kitchen smelled very fishy, but my cat showed up right away to see what was happening. I wanted a homemade treat that felt special but was still simple and safe. This recipe does exactly that by using an egg, anchovies, and flour to make small, crunchy bites.
What makes these cookies special is the strong fish taste and the light crunch on the outside with a bit of softness inside. I can make them small, which is perfect for cats, and I can control how long they bake. They are meant to be treats, not meals, and they work best when given in small amounts.
Here are a few reasons I like this recipe:
- Very simple ingredient list
- No added sugar or artificial flavors
- Quick to mix and bake
- Easy to make tiny, cat friendly shapes
Every cat is different, especially with salt and fish. Please talk to your vet about what is safe and appropriate for your cat, especially if your cat has health issues or needs a low sodium diet.
How to Make Anchovy Cat Cookies
- Preheat the oven and prepare a baking sheet.
- Blend the egg, anchovies, and flour into a dough.
- Knead the dough until it is smooth and not too sticky.
- Roll the dough to an even thickness.
- Cut the dough into small shapes.
- Bake until lightly golden.
- Let the cookies cool fully before serving.
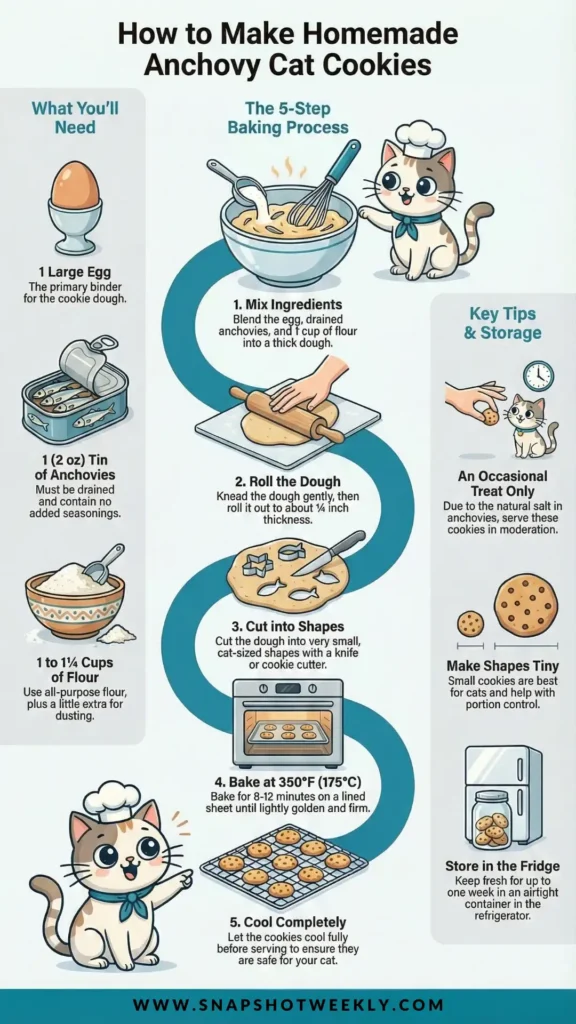
Ingredients
- 1 large egg
- 1 (2 oz) tin anchovies, drained (no added seasoning, note that anchovies are naturally high in sodium)
- About 1 to 1¼ cups all purpose flour (plus extra for dusting)
Directions
- Preheat your oven to 350°F (175°C). Line a baking sheet with parchment paper so the cookies do not stick.
- Add the egg, drained anchovies, and 1 cup of flour to a food processor or blender. Pulse until everything comes together into a thick dough.
- Place the dough onto parchment paper dusted lightly with flour. Knead it gently into a ball.
- If the dough feels very sticky, sprinkle on a little more flour and knead again. The dough should feel soft but easy to handle.
- Roll the dough out to about ¼ inch thick using a rolling pin.
- Cut out very small shapes with a cookie cutter or cut the dough into tiny squares with a knife or pizza wheel.
- Place the pieces on the prepared baking sheet and bake for 8 to 12 minutes. The cookies should look lightly golden and feel set.
- Remove from the oven and let the cookies cool completely before giving any to your cat. This helps keep mouths safe from heat.
Process Details
- The dough should not be wet or crumbly. Add flour a little at a time if it sticks to your hands.
- Thinner cookies will bake faster and be crunchier. Thicker ones stay a bit softer inside.
- Small shapes work best for cats and help control portions.
- Baking time depends on cookie size, so keep an eye on them near the end.
- The cookies are done when they are firm and lightly golden on the bottom.
Tips for Success
- Always check anchovy labels and avoid added spices or seasonings.
- Because anchovies are salty, give these treats only once in a while.
- Make cookies very small, especially for smaller cats.
- These are treats, not a full meal, so do not replace regular cat food.
- Let the cookies cool fully so they harden slightly and are safer to chew.
- If your cat has kidney issues or needs low sodium food, talk to your vet before making these.
Serving Ideas
- Offer one small cookie as a special reward.
- Break a cookie into tiny pieces for training or bonding time.
- Use as an occasional treat during playtime.
- Give only a small amount and watch how your cat reacts.
- Adjust portion size based on your cat’s size and diet.
Storage & Freezing
- Store the cookies in an airtight container in the refrigerator.
- They stay fresh for up to one week when kept cold.
- Let cookies come to room temperature before serving.
- If the cookies smell odd, feel slimy, or look moldy, throw them away.
- Texture may firm up more as they sit in the fridge.

These Anchovy Cat Cookies are a fun way to make a homemade treat using simple ingredients you can recognize. I love knowing exactly what my cat is eating and keeping treat time special but controlled.
- Change the shapes to keep things fun.
- Bake a little longer for a crunchier texture if your cat prefers it.
- Always watch your cat the first time they try a new treat.
Making something with care for your cat is a small act of love, and moments like these help build a happy bond you both can enjoy.


